

A tension fabric system is a lightweight aluminium frame fitted with a printed fabric graphic stretched drum-tight across its face, producing a smooth, wrinkle-free surface with no visible seams. It suits any brand that needs a large, portable display that it can reconfigure or refresh often, from trade show backwalls to retail rollouts. If your brief demands quick turnarounds, easy transport, and repeat use, this is usually the better format over rigid panels.
TL;DR:
- Deeper profile depths provide better resistance to flex and prevent ripple effects on large spans, ensuring a flat, professional finish.
- Heavy-duty fabrics with higher GSM are necessary for backlit panels to avoid light bleed, especially when using illumination.
- Ensuring the frame is square and assembling corners in a consistent order reduces warping and speeds up the installation process.
- Frame connector type and support stays are critical components that should match the intended use and be ordered as standard.
- Prioritizing frame quality and maintaining a stock of spare parts can prevent delays or failures during repeated multi-site rollouts.
Table of Contents
- What are the different types of tension fabric systems?
- How does a tension fabric system actually work?
- What materials and specifications should you request?
- Where do tension fabric systems add the most value?
- How do you assemble a tension fabric system correctly?
- How do you maintain and store tension fabric systems between events?
- Why do tension fabric graphics wave, bow, or bleed light?
- Why choose A3m for tension fabric systems and branded environments?
- What most guides get wrong about tension fabric systems
- Ready to commission your tension fabric system?
- Sources
What are the different types of tension fabric systems?
Choosing the right format starts with matching the frame style to how the display will actually be used. A tension fabric display system generally falls into one of a handful of configurations, each suited to a different job.
- Single-sided vs double-sided: single-sided suits wall-mounted backdrops; double-sided works for freestanding room dividers or island stands visible from all angles.
- Freestanding, wall-mounted, or suspended: freestanding frames give you flexibility on the show floor, wall-mounted units suit permanent retail fit-outs, and suspended fabric structures work well for overhead branding in atriums or arenas.
- Pillowcase and zipper walls: the fabric graphic zips closed around the frame like a pillowcase. Quick to fit, forgiving of minor frame imperfections, but slightly less taut than SEG.
- SEG frames: silicone edge graphic channels grip the fabric’s edge for a tighter, more architectural finish. Slower to master, better results.
- Illuminated lightboxes: backlit fabric panels for retail windows or gallery-style branding, delivering strong shelf presence after dark. A3m’s guide to illuminated exhibition displays covers this in more depth.
- Modular walls: interlocking frame sections that scale from a 3-metre backwall to a full stand, useful for growing exhibition programmes.
How does a tension fabric system actually work?
The mechanics are simple, but the details separate a professional finish from an amateur one. Every tension fabric display system relies on the same core components working in balance.
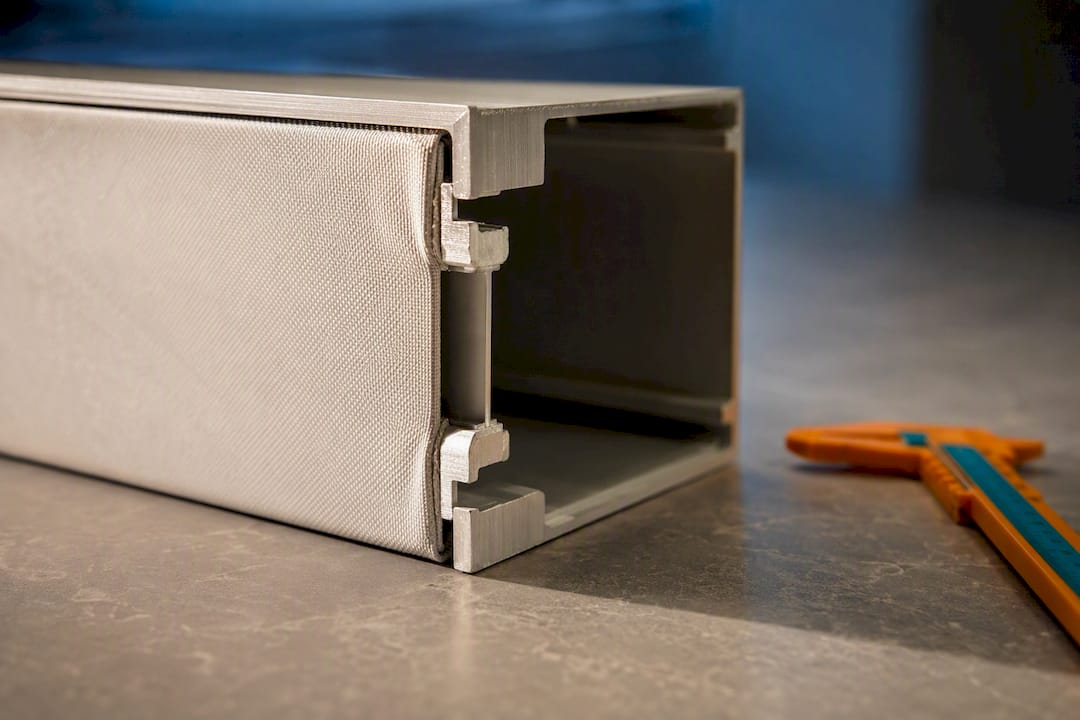
- The aluminium frame forms the skeleton, held square by corner connectors that lock the structure into a true rectangle before any fabric goes near it.
- Internal support stays run across the frame’s interior on anything wider than 2 metres, stopping the middle of the panel from bowing forward under load.
- The keder or SEG channel runs around the frame’s perimeter, gripping either a keder bead sewn into the fabric edge or a silicone strip pressed into an aluminium track.
- The graphic itself stretches roughly 1 to 3% beyond its printed size, which is what pulls the surface flat once seated.
Frame rigidity and profile depth matter more than most buyers expect. A shallow, thin-walled frame flexes under tension and shows faint waves across the graphic, particularly on spans over 3 metres, while a deeper profile resists that flex and keeps the face genuinely flat.
Pro Tip: Ask your supplier for the frame’s profile depth in millimetres before you order, not just the overall dimensions. A deeper profile on a large backwall is the single easiest way to avoid a rippled finish.
What materials and specifications should you request?
Getting the specification right up front saves a reprint later. Most reputable suppliers work to a fairly consistent set of standards for tension fabric structures, and you should hold them to it.
- Fabric type: warp-knit polyester is the industry standard for stretch displays, chosen for its recovery and print consistency over woven alternatives.
- Weight (GSM): typical weights run in the range commonly accepted for such fabric, providing suitable opacity and durability; heavier fabrics toward the top of that range give better opacity for backlit lightboxes, where light bleed through thin fabric ruins the effect.
- Print method: dye-sublimation, which embeds ink directly into the polyester fibres rather than sitting on top, so the graphic resists cracking and can usually be machine washed between events.
- Fire safety: confirm the fabric carries flame-retardant certification suitable for your venue; most UK exhibition halls will refuse a stand without paperwork on the day.
- Hardware: ask for the frame’s connector type and any support stay count included as standard, not as an optional extra.
A3m’s guide to large format print goes further into how print method affects colour accuracy at scale, which matters more on fabric than most buyers assume, given how much the weave texture softens fine detail compared to a rigid panel.
Where do tension fabric systems add the most value?
Fabric earns its keep wherever a brand needs the same display to work hard across multiple settings. It shows up most often in:
- Trade shows, where a backwall needs to pack flat, travel light, and go up fast between sessions.
- Retail rollouts, where dozens of stores need identical branding delivered on a schedule, and frame reuse with fabric refreshes cuts long-term costs.
- Hospitality and branded environments, where the softer, matte finish reads as more premium than gloss vinyl on a hotel lobby wall.
- Galleries and exhibitions, where fabric’s light-diffusing quality suits ambient lighting better than a reflective panel.
Fabric is the wrong call, though, when you need a genuinely rigid, load-bearing surface, such as a counter front taking daily knocks, or ultra-fine detail reproduction where the weave texture would blur a logo’s edges. For a closer look at how backwall formats compare on the show floor, A3m’s piece on why trade show banners matter is worth reading alongside this section. Retailers weighing fabric against digital messaging might also find SignStream’s look at flash-sale display screens useful for comparing static and screen-based tactics.
How do you assemble a tension fabric system correctly?
A drum-tight finish comes down to sequence, not brute force. Rushing the corners or skipping the squaring check is the single most common cause of a poor result on site.
Before touching the fabric, run three prechecks: confirm the frame sits on a level surface, check the frame is square using a diagonal measurement rather than eyeballing it, and lay out every bar, connector, and stay so nothing is missing mid-build.
- Assemble the skeleton first, locking every corner connector fully before adding any stays.
- Insert internal support stays for any span over 2 metres, seating them before the fabric goes on.
- Fit the fabric using the four-corner method, securing all four corners first rather than working along one edge at a time.
- Seat the remainder from centre to edge, working outward from the middle of each side to avoid trapping a wave against a corner.
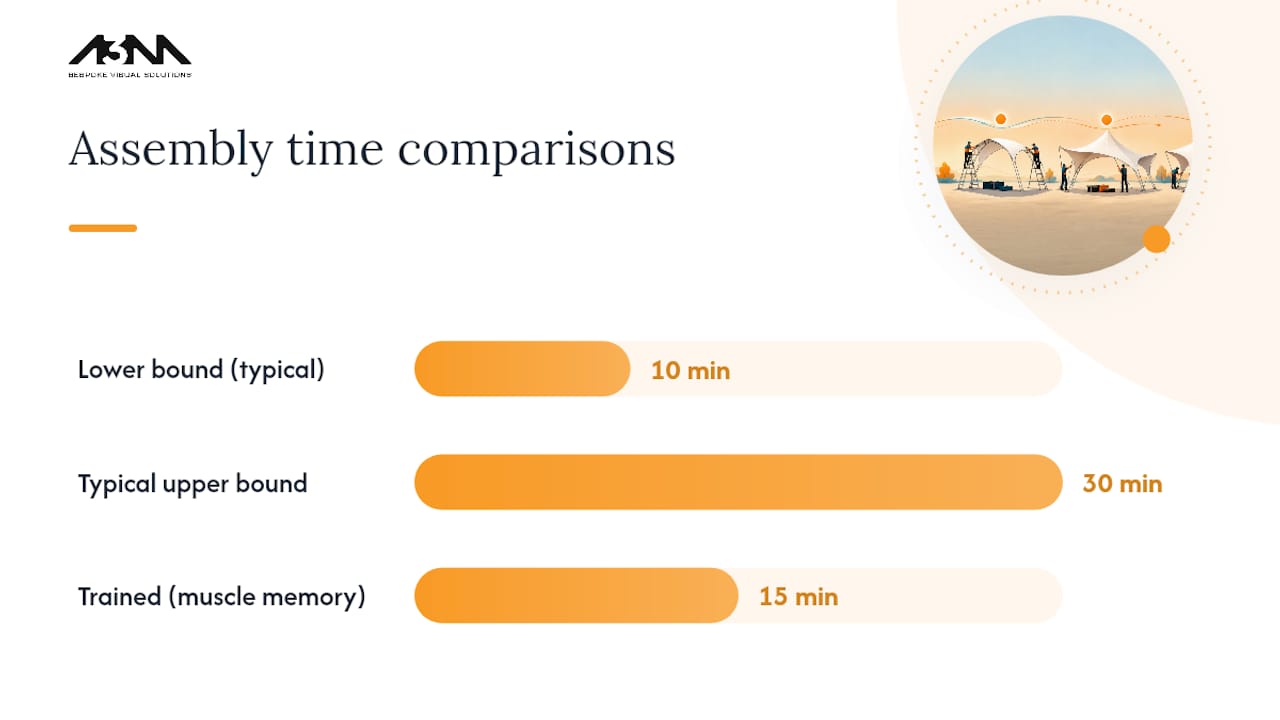
Assembly time varies by system and operator experience, but a typical 10ft backwall takes 10 to 30 minutes for one or two people once they know the sequence. Larger modular walls need a two- or three-person crew and a step or trestle for anything above head height.
Pro Tip: Do the four corners in the same order every time (clockwise, starting top-left) so muscle memory takes over on your third or fourth event. It’s the fastest way to cut a 30-minute build down to 15.
How do you maintain and store tension fabric systems between events?
Fabric graphics reward reasonable care with a genuinely long working life, and the biggest gains come from how you pack and store them rather than anything you do on show day.
- Fold, don’t crease sharply. Roll graphics where possible; sharp folds held under pressure for weeks can leave faint lines.
- Wash gently using the dye-sublimation fabric’s washability, cold cycle, no fabric conditioner, air dry flat.
- Transport light. Tension fabric systems weigh dramatically less than rigid alternatives, cutting courier costs and letting one person carry a full backwall kit unassisted.
- Plan spares for rollouts. Keep a small stock of connectors and stays; a single lost part shouldn’t ground a multi-site launch.
A3m’s guide to exhibition stand storage covers packing crates and rotation systems in more detail if you’re running a busy events calendar.
Why do tension fabric graphics wave, bow, or bleed light?
Most on-site problems trace back to one of three causes, and none of them need a full reprint to fix.
- Waves or “smiling” fabric: usually uneven tension from seating one side before the others. Partially de-tension and reseat corner-first rather than forcing more fabric in.
- Keder popping out: often a channel dimension mismatch or debris in the track. Clear the channel and check the keder bead size against the frame spec.
- Light bleed on backlit units: almost always a GSM or opacity issue; a heavier backlit-rated fabric solves it, not more LEDs.
Pro Tip: If a wave persists after reseating twice, call a professional installer rather than pulling harder. Forcing an already-tensioned graphic risks tearing the keder seam.
Why choose A3m for tension fabric systems and branded environments?
A3m manufactures large-format graphics, exhibition stands, and branded environments in-house across the UK, covering everything from bespoke frame builds to dye-sublimation printing under one roof. That means the specification you agree on paper (GSM, stretch, fire rating) is the one that arrives on site, checked by the same team that printed it. For businesses running multi-venue rollouts, A3m also delivers web-to-print portals so every location orders consistent, pre-approved fabric graphics without a design bottleneck.
What most guides get wrong about tension fabric systems
Most buying advice treats tension fabric systems as a straightforward upgrade on vinyl banners: lighter, smarter, done. That undersells the one variable that actually determines whether a display looks premium or amateur, which is frame profile depth, not fabric quality. Two suppliers can print from the same warp-knit polyester at the same GSM, and one wall will still look flatter than the other purely because its frame resists flex better.
The conventional advice also underweights spare parts. Every rollout plan focuses on the graphic refresh cycle and barely mentions connectors and stays, yet a missing stay is what actually grounds a launch on the morning of an event. If you’re procuring for repeat use, prioritise frame quality and a spares stock before you obsess over print resolution. Resolution problems are visible in a proof; a bowed frame or missing stay only shows up on site, usually an hour before doors open.
Buyers who get this right treat the frame as the long-term asset and the fabric as the consumable, which is exactly the ownership split that keeps rollout costs down over several years rather than one event.
— Steve
Ready to commission your tension fabric system?
A3m builds tension fabric systems in-house, from frame to finished graphic, so what you specify is exactly what turns up on site, no third-party print run in between. That in-house control matters most when you’re working to a fixed event date and can’t afford a supplier hand-off to go wrong halfway through.

To get an accurate quote, have these ready when you get in touch: overall dimensions, single or double-sided, lit or unlit, and your event or install timeline. From there, A3m’s team confirms frame profile, fabric spec, and turnaround, and can advise on modular options if you’re planning to reuse the hardware across multiple events. Start by browsing A3m’s bespoke exhibition stands page or send through your dimensions directly for a quote.
Sources
For deeper technical detail beyond this guide, the CokerExpo assembly manual covers SEG seating in more depth, the Zodiac Displays material guide breaks down fabric specifications further, and The Upcoming’s piece on tension-based design explores the wider design trend.